Showing posts with label tutorial. Show all posts

Thursday, August 2, 2012

Retro Patriotic Starburst Nails Tutorial

I hope you all had a wonderful 4th of July - even if this post is almost a month late! 


Next time you do something patriotic (or you just want to cheer on the U.S. for the Olympics Games!), try out this simple manicure. 
I think it would be better if the starburst lines were coming from a different direction, but these still look interesting nonetheless.

Instructions:
1. Paint on your nails a white base to represent the white stripes in the American flag. 
2. Using a sponge, sponge on some yellow to make the white look aged. If you have a more "cream" colored white, you can use that and skip this step!
3. Cut some diagonal stripes out of tape. Don't make enough for each stripe on every nail, as you can reuse the tape a couple of times. 
4. Place around 3 diagonal strips of tape on your nail and press down to ensure they're secure. 
5. Sponge red polish onto 3 out of 4 spots available to paint. Leave one of the two middle ones bare. 
6. On the last one, sponge on a dark navy blue. Use a small sponge for precise application, but still ensure that it's slightly messy and gives a sponged effect. That's what makes it look all cool and retro! 
7. Then, put some fine or even chunky glitter on the blue stripes to mimic the stars in the flag. I used more chunky glitter that I stuck on with some top coat. 
8. Lastly, add your top coat to finish off your design and make it chip-proof! 

And that's it! Hope you liked this fun nail art tutorial. 
-H. <3 

Tuesday, March 27, 2012

Spring Flower Nails Tutorial


1. Paint your nails a creamy purple color besides your ring finger. Here I'm using Tutu Cute by Ulta (and you have to admit that the name itself is too too cute!).
2. Now use a white polish to paint your ring finger. The one I used was Wet n' Wild's French Creme.
3. Here are the things you'll need for this nail design. Instead of a brush you can use a bobby pin or pen for the flowers and a toothpick for details.
4. Create messy dots to represent the flowers on the white base of the ring finger.

5. Now mix the purple with the white polish to create a light purple used for detailing.
6. Draw a swirly design within the flowers, like in the picture.
7. Now take out your green polish and draw 2-3 leaves around the flowers.
8. And lastly, set your design with a shiny topcoat.
Remember that this design can also be done with toothpicks and bobby pins, so don't be bummed by seeing the brush.
Also, play around with it- do the springy flowers on all your nails or on your toes, or even have a different color scheme.
Hope you all try it out! I'd love to see a picture.
XO

Monday, March 26, 2012

Tuxedo Nails Tutorial

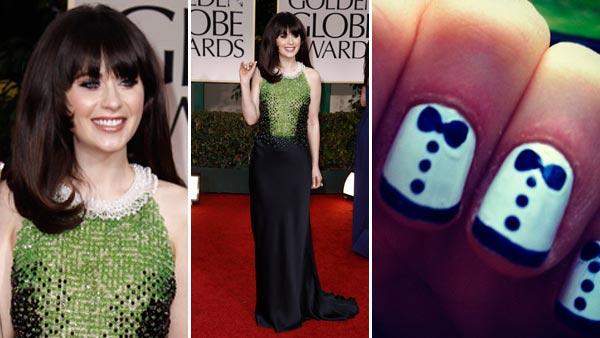
A while ago I decided to try out these cute tuxedo nails. 
They were inspired by Zooey Deschanel in this year's Golden Globes. She actually tweeted about them, so the picture on the far right of the photoset underneath is one that she took of her nails. 
Zooey Deschanel is such a cute and quirky actor. I love watching her in movies or in her show, New Girl. (I have to catch up on it, though.)
So my nails are pretty similar, but I decided to go with just a very, very small black tip instead of the normal black french tip that she's sporting. I wanted more space for the bow and the buttons. :)
Here's a little tutorial on how to have quick and easy nails like her:
1. Start of with a white base. Here I am using a Wet n' Wild white creme color. 
2. Since I couldn't find my brushes, I decided to use both a pen and a pencil. I still need to search for those. Both of these are good alternatives too if you do not own a brush/dotting tool. In the picture, I added a blob of black polish on a post-it note to use in my nail art. 
3. Create a bow using your lead pencil. It's fairly easy- just connect two triangles together. 
4. Line the outer edge of your nail with black polish on the tip of your lead pencil. If you want a thicker tip, I suggest using a steady hand to glide the black across. Make sure while you are doing this to move your finger in the direction you want, rather than the nail polish brush- this makes it an easy application. If you're not able to do this, try a nail art pen. 
5. Make three dots with a pen. The reason why we use a pen in this rather than the lead pencil is that the pen has a thicker tip, making the dots a larger size. 
6. Not pictured, but protect your design and give it some shine with a good top coat.
And wala! Here are your fancy, schamncy tuxedo nails. You'll look spiffy all over town. :) Hope this helped!